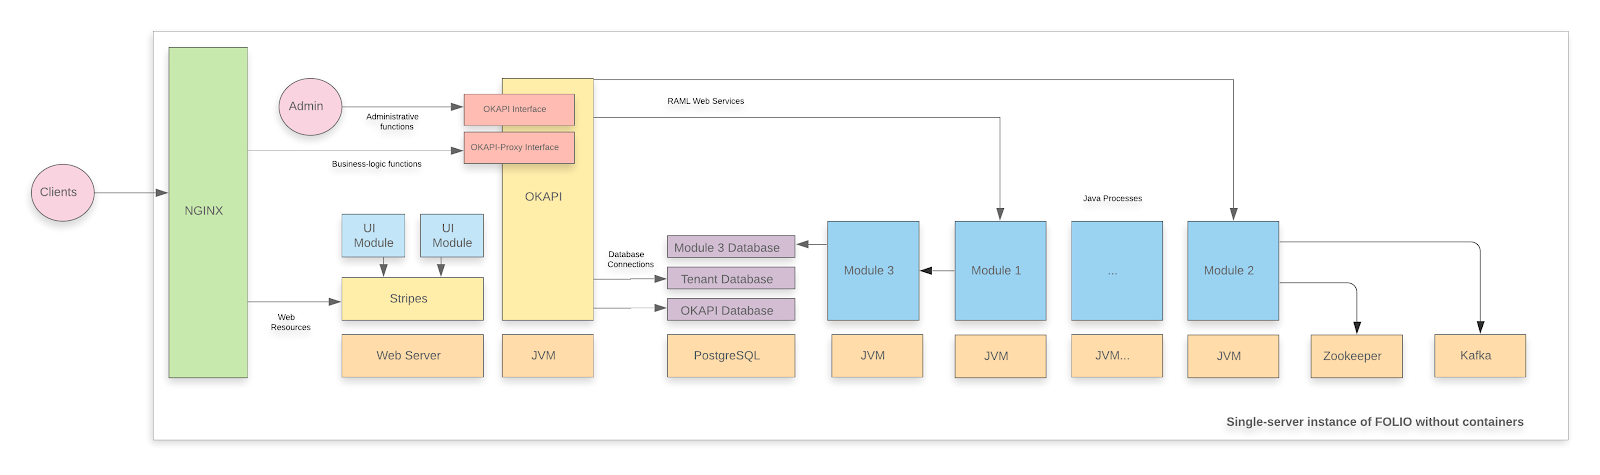
Single server without containers
Warning: This deployment method is still considered an experimental method. It is still a work in progress. Currently, installation is only available for Okapi and the backend modules with this method. The backend installation is not secured at this time. The Stripes deployment is blocked by an unsolved issue in the configuration of each module. It is not recommended for setting up a production system at this time.
With this type of deployment, each module of FOLIO is bundled with a DEB package and runs directly on the host operating system without containers.
There are several differences between this type of deployment and the docker container deployment method. When this type of deployment is used:
- Each module creates a new systemd service and user on the operating system. The name of the new systemd service is prefixed with ‘folio-’.
- Each module creates a new database and role in PostgreSQL.
- PostgreSQL databases and roles are created with customizable prefixes.
- No PostgreSQL superuser roles are required for Okapi or the modules. The superuser role is required during the installation.
- Modules and users are prefixed with ‘folio-’.
- The RAM requirement of each module is reduced to about 71MB.
Note: This installation process is still under development and it is NOT recommended for setting up a production system. At the moment, only the Okapi and backend modules are considered on this installer, the installation of Stripes has to be manually executed.
System Requirements
Software requirements
| Requirement | Recommended Version |
|---|---|
| Operating system | Ubuntu 18.04.5 LTS (Bionic Beaver) 64-bits or Debian Buster amd64 |
| Java | OpenJDK 11 |
| PostgreSQL | PostgreSQL 10 |
Hardware requirements
| Requirement | FOLIO Base Apps | FOLIO Extended Apps |
|---|---|---|
| RAM | 6GB | 12GB |
| CPU | 4 | 8 |
Installation Requirements
- Add the Folio Debian Repo to your system:
sudo add-apt-repository "deb http://folio-repo.bib-bvb.de/repo folio-bleeding main"
wget -qO - http://folio-repo.bib-bvb.de/repository.gpg | sudo apt-key add -
- Import the PostgreSQL signing key, add the PostgreSQL apt repository and install PostgreSQL.
wget --quiet -O - https://www.postgresql.org/media/keys/ACCC4CF8.asc | sudo apt-key add -
sudo add-apt-repository "deb http://apt.postgresql.org/pub/repos/apt/ $(lsb_release -cs)-pgdg main"
sudo apt-get update
sudo apt-get -y install postgresql-10 postgresql-client-10 postgresql-contrib-10 libpq-dev
- Allow connections in PostgreSQL.
Note: This is only necessary if you run your PostgreSQL server on a different machine. If you plan to run it on the same server as the FOLIO deployment, skip this step.
- Modify the line listen_addresses = … in /etc/postgresql/10/main/postgresql.conf to make PostgreSQL listen on the necessary interfaces.
- Add the line all all w.x.y.z/32 md5 to /etc/postgresql/10/main/pg_hba.conf (with w.x.y.z being the IP address of your FOLIO host).
- Restart PostgreSQL with command sudo systemctl restart postgresql .
Installing Okapi
sudo apt-get update
sudo apt-get install folio-okapi
This DEB package will start a graphical installer where you can configure Okapi.
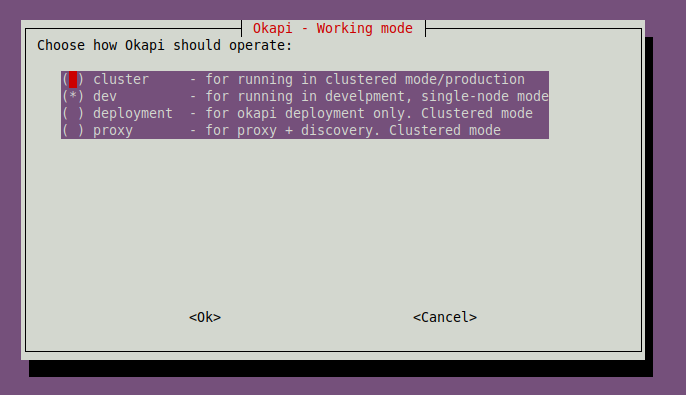
This wizard has the following stages:
- Select a working mode. If you want to install FOLIO on a single server configuration, you should choose ‘dev’.
- Select port range of Okapi. The default port range 9130-9149 is NOT recommended, since there’s too few ports in this range for all the modules.
- Choose the backend type. PostgreSQL is the recommended.
- Database host and port. Insert IP and port of the PostgreSQL server or simply ‘localhost’ if it is running on the same server.
- Enter the PostgreSQL user for Okapi. For example, folio_okapi.
- Enter the PostgreSQL database for Okapi. For example, folio_okapi.
- Enter the PostgreSQL password for Okapi. Provide a secure password or leave it empty to use a auto-generated password.
The installer will automatically apply these configurations on the PostgreSQL server if you provide superuser credentials or you can create them manually.
- Apply the database connection details. If you decide to set up a PostgreSQL database for Okapi automatically, you have to enter superuser credentials.
- Enter a PostgreSQL superuser. Enter the username of a postgres administrator account (e.g. root).
- Enter superuser password.
The installer will configure and start Okapi automatically with the configurations that you have provided. Additionally, you can create new tenants on Okapi in the next step of the installation process or you can create them later.
- Create a new tenant / ID. Enter an ID for the tenant (e.g. diku).
- Create a new tenant / name. Enter the name of the tenant.
- Create a new tenant / description. Enter a description for the tenant.
- Create a more tenants. The tenant creation wizard will start over. You can add multiple tenants if you want. If you do not, press cancel.
Once you have installed Okapi, you can install modules and assign them to tenants.
Note: Take into account that Okapi is not secured by default. When you finish configuring your tenants, you should enable the authentication/authorization validations. More detailed information can be found in the Okapi management section.
Installing modules
The complete list of available installers for FOLIO modules can be found here, or by apt-get autocompletion. Currently, the modules that depend on the mod-pubsub module do not have support. The modules are bundled as DEB packages that deploy Java processes and register themselves with Okapi.
With this deployment method, each module is installed independently. If you want to install a suite of apps similar to platform-core or platform-complete, you can find the list of modules that you have to install in the github repositories. The backend module list can be found in the file okapi-install.json and the frontend modules in the file stripes-install.json.
For example, the list of modules of the platform-core suite is the following:
mod-calendar
mod-inventory-storage
mod-circulation-storage
mod-users
mod-event-config
mod-configuration
mod-template-engine
mod-email
mod-sender
mod-notify
mod-login
mod-permissions
mod-pubsub
mod-source-record-storage
mod-inventory
mod-feesfines
mod-patron-blocks
mod-circulation
mod-codex-mux
mod-password-validator
mod-authtoken
mod-users-bl
mod-notes
mod-tags
mod-login-saml
mod-codex-inventory
Note that the DEB packages of these modules add the prefix ‘folio-’ to their names. For example, the module ‘mod-tags’ is located in the DEB package ‘folio-mod-tags’.
Before installing modules, make sure you have configured enough ports for each instance of the modules. This configuration was set in the installation wizard for Okapi, but you can override it by editing the okapi.conf file (See Okapi management).
The installation process for each module is the same. In the following example, the module ‘mod-circulation’ will be installed.
- Run the DEB installer.
sudo apt-get install folio-mod-circulation-storage
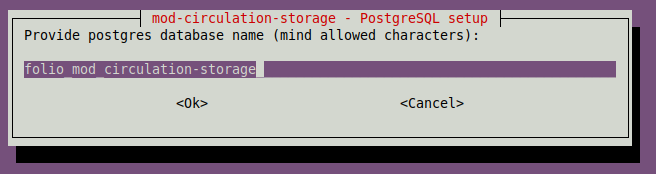
The DEB package will start a graphical installer with following stages:
- Database configuration / Database name. Enter the name of the database where the data of the module will be stored.
- Database configuration / Database user. Enter the username that owns the database.
- Database configuration / User password. Provide a secure password or leave it empty to use a auto-generated password.
- Database configuration / Host. Provide the PostgreSQL server IP address (e.g. localhost).
- Database configuration / Port. Provide the PostgreSQL server port (e.g. 5432).
- Database configuration / Set up now?. Similar to the Okapi installation, you can automatically apply the new configurations on PostgreSQL if you provide superuser credentials (Select Yes). Or, you can apply them manually later (Select No).
- Module / Number of instances. Enter the number of instances of the module.
Once you have deployed the modules that you require, you can proceed to link them to a tenant and install Stripes
Installing Stripes
Since Stripes is out of the scope of this deployment process, you will have to install it manually. You can follow the instructions described in the Single server with containers for Stripes installation.
Okapi management
Check the status
You can check the status of the Okapi service and the modules services using systemctl.
sudo systemctl status okapi.service
Additionally, you can perform other systemctl actions on the Okapi such as: stop, start or restart.
Change the configurations of Okapi
The configuration files of Okapi are located in the folder: /etc/folio/okapi/. The following configuration files are available:
- hazelcast.xml Configuration of communication and shared storage (cluster mode).
- log4j2.properties Logging configuration.
- okapi.conf Okapi service configuration (ports, host, database, etc).
Take into account that you have to restart the Okapi service if you change the okapi.conf file.
Secure Okapi
In order to secure Okapi, you should run the secure-supertenant script. The usage of this script is explained in the Secure Okapi section of the Single Server Installation Guide. Be aware this will break autoregistration of modules during restarts as of now!
Tenant configuration
Add a new tenant
If you want to create a new tenant, you can use the script addtenants.
sudo /usr/share/folio/okapi/bin/addtenants newtenant
Note: You don’t have to pass the ID of the new tenant as argument to the script. If you don’t, it will simply ask you.
This starts a graphical wizard similar to the one shown in the Okapi installer and all the tenants are registered in the file /etc/folio/tenants.
Enable modules for a tenant
The modules installed need to be enabled for each tenant. This process is performed through Okapi requests. You can obtain the complete list of installed modules by executing a GET request to Okapi.
curl http://localhost:9130/_/proxy/modules
The response will be a JSON file that contains the identifier and name of the active modules (e.g. mod-circulation-storage-12.2.0-SNAPSHOT). The module installer appends the version of the module when the module is registered on discovery web services for Okapi.
The operation of enabling a module for a tenant is performed in a single POST request to Okapi. You will need the identifier of your tenant (e.g diku) and the identifier of the module that you want to enable.
cat > /tmp/okapi-enable-module.json <<END
{
  "id": "mod-circulation-storage-12.2.0-SNAPSHOT"
}
END

curl -w '\n' -X POST -D - \
  -H "Content-type: application/json" \
  -d @/tmp/okapi-enable-module.json \
  http://localhost:9130/_/proxy/tenants/diku/modules
Bootstrap a superuser for the tenant
In order to create a superuser for a new tenant, you should run the bootstrap-superuser script. The usage of this script is explained in the Create a superuser section of the Single server with containers guide.